| pillow_case_dress_pattern.pdf |
|
Pillow Case Dress And Boutique Pillow Case Dress
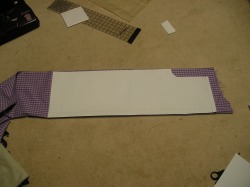
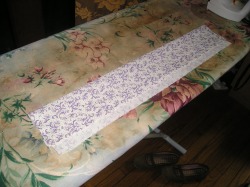
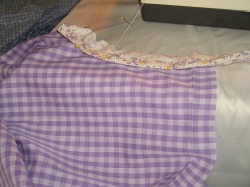
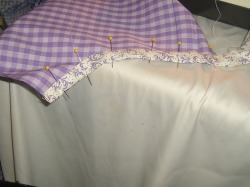
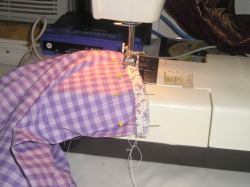
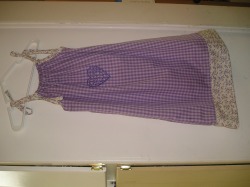
There are actually 2 types of pillow case dresses first is the "true original" Pillow case dress. And That would be made from a pillow case. They were cute simple and made to be worn by a child in the 6-8 age range. They were always made the same and had no size. The size was determined by how tight you tied the arm strings. The same dress can be worn by a child who is size 7 or can even be worn as a long top by older girls. And then there came along the boutique pillow case dress of today. They have taken a simple dress and spiced it up. I love the wonderful details such as embroidery that have been added, but sadly they have also made pillow case dresses seem more complicated than they are. While talking to my local Fabric lady (Hi Dawn) she was very excited that they had come out with a pillow case dress pattern. AHHH I said why would you buy a pattern to make a pillow case dress, the whole point to these dresses is simplicity. So I told her I would go home and make her a pattern, and here it is. As I am just making my web site for my embroidery business, I thought what better than to put this pattern on the web site, since I have seen many requests for pillow case dresses on line in forums, and though there are many instructions I have found no actual printable patterns and many people fell they need a pattern to get it right. This is a simple pattern to make a pillow case dress. I have also included some of the boutique stylings to dress up your dress, but hey I would still rather see you cut up a cute pillow case, but hey that's just me. Print the Pdf shown on top of this page. Follow the instructions with the pdf. on how to assemble the pattern. To begin you will need 1 yard of your primary fabric 1/4 Yard of contrast fabric for the cuff on the bottom. A fat quarter cut will work. (If you choose not to use a contrast fabric you will need to add one inch in length to size 6/7 - 2 inches for 8/9 and 3 inches for size 9/10.) 1 package of Bias tape. But if you know how to make your own Bias tape you can make it out of an additional 1/8 yard of your Contrast fabric. (But you will want to use fabric cut from the roll, not fat quarters, because making bias tape from fat quarters is tedious to say the least.) If you are going to embroider any designs, you should also have a square of iron on Pellon or any good stabalizer the size of your graphic. For tools we need an ironing board, iron and sewing machines. And if you are one of those pinning types, well you can get a few of them too. Once you have put together your pattern you will need to decide what size you are making. I am making size 7 . Fold or cut you pattern along the lines so the pattern is the right size. Then place on Your fabric along the fold(make sure to double check it is on the fold side. If you are lucky enough to have 60 wide fabric you will be able to cut both your front and back together. If you have the 45 which is more common now days you will need to cut two separately. Then you will need to cut your contrast fabric. If you have gotten a Fat quarter simply fold it in half length wise and cut it. Or if you are like me and using some fabric off the bolt. Use the pattern square included again it should be put on the fold and you should cut 2. The next step is to go to the ironing board. You will need to iron your contrast fabric in half and then again turn 1 side under 1/4 inch. Do this with both contrast fabrics. (see Picture 2) Then pin the side that you have NOT folded up with good sides facing to the front of your dress and stitch along the seam(I will try to get a picture of this later but if you look down at the picture below of the bias tape it is the same procedure) Then flip the fabric to the back and do a running stitch along the edge. If you are doing any embroidery on the front of you dress, now is a good time to do it while you work attaching the contrast to the back of your dress. Once you have your contrasts attached stitch the back and front of the dress together down the sides. And then zig zag stitch along these seams to insure they do not fray. Now you will need the bias tape. This can either be bought at your local fabric store (or walmart if you are lucky enough to still have your fabric section.) Of if you are an experienced stitcher you can make some out of your contrast fabric. Open up the bias and pin one side to the arm hole like show in the picture 3 and sew along this side of the bias tape. Now unpin it and flip it over so it covers the intire seam and stitch along the top of the seam. (picture 4) Just a side note: you may notice I am useing a 20 year old sewing machine with quite a bit of wear, (picture 5)not my squeeky clean 1 1/2 year old Singer. Well this is a lesson in quality. This machine that I bought for my daughter at goodwill for $7 was the top of the line Kenmore when it was new and came with a 25 year warrenty(can you believe it, never see that these days). YES this old thing is still under warrenty and will be going strong long after the warrenty wears out. But My new Singer, has only a 1 year warrenty. And you guessed it, just after the warrenty ran out, so did the piece of junk machine. So the lesson learned in this, is of course, they do not make things like they used to. And do not feel guilty for buying that 7$ thrift store or garage sale machine, or better yet pick it up for free on freecycle or Craigslist. Chances are you will end up with a far better machine than your friend that buys that squeeky clean new machine. Ok by now you should be able to see your dress is starting to resemble the a dress slightly. Now go back to the ironing board and iron the top of the front and back first over one inch and then fold it again over an inch to form the top casing. Now this is where the variation is between the Boutique variety of pillow case dress and the old fashion grow with you pillow case or flour sack dresses of the great depression. I am making the old fashion type. For this you simply take what is left of your bias tape and sew it together to form a string. Cut this string in half (They should each be about be about 2 1/2 feet long. and Use a pin and push this through the 1 inch casing at the top or your dress. 1 on the front and one through the back. These strings are then tightened and tied over the shoulders. As the child grew you would simply tie the shoulder straps looser. But lets face it today we are not nearly as bad off as in the great depression. You will not find many families so poor they need to use pillow cases as dresses (and if they did, hey they would be trendy anyway) And if you are planning on using those big beautiful ribbons as the shoulder strings, they are going to be very bulkey through your 1 inch casing. So the pattern has been altered by measuring the child you want this dress to fit across the chest from just below the shoulder blades. For most children this should be somewhere around 6 inches. And cut 2 pieces of elastic. Run these through the casing and stitch them on either end. This will hold the dress ruffeled and allow you to stitch those big beautiful bows to the shoulder straps. Simply stitch the bows to the back side of the dress right behind where you stitched the elastic. The only down side to this is that you can not adjust the size without replacing the elastic and the fact is those pretty pink ribbons always tend to look dingy in a few wearings, but hey sometimes a girl just wants to look cute. I hope you like the pattern. Please feel free to contact me with any comments and corrections. I would love to be able to have a comments section on this site, but the fact is I have not figured out that part yet. I am guessing it has to be a blog to set up that way. But I would love to hear from anyone who makes this dress and I will gladly post pictures of the dresses you make. |
       |
